Showing posts with label Installing. Show all posts

Monday, April 12, 2010

Installing Scripts - Photoshop Elements for Windows XP

These instructions will help you install Scripts for Photoshop Elements (PSE) on Windows XP. Since PSE does not have an option to run a script directly, it will run from an action. Once installed, your script will run the same as any other action.

Close PSE, if you have it running.

Locate the folder for your operating system within the files you have downloaded and unzipped. Inside this folder you will find an .atn (action) file, a .png file and a .jsx Script file.

Install the Script:
Copy and paste the .jsx file to the following location:
C:\Documents and Settings\All Users\Application Data\Adobe\Photoshop Elements

Install the Action:
Copy and paste the .atn file and .png file to the following location:
C:\Documents and Settings\All Users\Application Data\Adobe\Photoshop Elements\(your version number)\Photo Creations\photo effects

Note: If you can’t see the Application Data folder, it is hidden. You will need to tell the computer to unhide it. This is how:

Go to Tools>Folder Options

Click on the “View” tab. Under the Hidden files and folders icon, select “Shown” hidden files and folders. Click on “Apply” and then “OK.” You can then go back and follow the path to the Photo Effects folder.

Hint: To easily find this folder again, so that you can install additional actions, select the option to create a desktop shortcut to it by right-clicking on the photo effect folder before you enter the folder. Make sure you do this BEFORE you enter the folder.

Now that you have installed the new actions, restart Photoshop Elements.

Run the Action (which runs the script):
Choose “Photos Effects” and then “Show All” from the drop-down list.


You will now see the icons for the new action you installed listed along with the other ones. The actions will be in alphabetical order. If you hover over the icon, you will see the name pop up.

Note: If you have followed all of these instructions and your actions are not showing up in the effects window, you may need to rebuild the media database for PSE.

To Rebuild the Media Database:
• Close PSE
• Go to C:\Documents and Settings\All Users\Application Data\Adobe\Photoshop elements\(your version)\Locale\en_US
• Find the file named “MediaDatabase.db3” and rename it to “MediaDatabaseOLD.db3”
• Restart PSE

Keep in mind that since you renamed the Mediadatabase.db3 file your program will have to rebuild, so you may have to wait a while for it to do so. Also, after every group of new actions is installed, you may need to repeat these steps. Any 'old' database files can be deleted before repeating. When PSE has restarted, choose “Photos Effects” and then “Show All” from the drop-down menu.

Once the action/script is installed and showing up in the effects palette, prepare the workspace according to the instructions included with the script. Some scripts will require a certain type of file to be open and saved or certain layers to be active. See each product specific instructions for the details. When you are ready to try run a script, double-click on the icon on the effects palette and it should begin right away.

It is a good idea to save any work you have started before running an action/script! It may perform steps that you won’t be able to just “undo.”

Installing Scripts - Photoshop Elements for Vista and Windows 7

These instructions will help you install Scripts for Photoshop Elements (PSE) on Vista and Windows 7. Since PSE does not have an option to run a script directly, it will run from an action. Once installed, the script will run the same as any other action.

Close PSE, if you have it running.

Locate the folder for your operating system within the files you have downloaded and unzipped. Inside this folder you will find an .atn (action) file, a .png file and a .jsx script file.

Install the Script:
Copy and paste the .jsx file to the following location:
C:\ProgramData\Adobe\ Photoshop Elements

Install the Action:
Copy and paste the .atn file and .png file to the following location:
C:\ProgramData\Adobe\ Photoshop Elements\(your version number)\Photo Creations\photo effects

Note: If you can’t find the folder, it is hidden. You will need to tell your computer to un-hide it. This is how: Go to My Computer \C: and type Alt+T. This will bring up a menu. Click on “View” and check the box to Show Hidden Files.

Hint: To easily find this folder again, so that you can install additional actions, select the option to create a desktop shortcut to it by right-clicking on the photo effects folder before you enter the folder. Make sure you do this BEFORE you enter the folder.

Now that you have installed the actions and scripts, restart Photoshop Elements.

Run the Action (which runs the script):

Choose “Photos Effects” and then “Show All” from the drop-down list.


You will now see the icons for the new action you installed listed along with the other ones. The actions will be in alphabetical order. If you hover over the icon, you will see the name pop up.

Note: If you have followed all of these instructions and your actions are not showing up in the effects window, you may need to rebuild the media database for PSE.

• Close PSE
• Go to C:\ProgramData\Adobe\Photoshop Elements\(your version number)\Locale\en_US
• Find the file named “MediaDatabase.db3” and rename it to “MediaDatabaseOLD.db3”
• Restart PSE

Keep in mind that since you renamed the Mediadatabase.db3 file your program will have to rebuild, so you may have to wait a while for it to do so. Also, after every group of new actions is installed, you may need to repeat these steps. (Any 'old' database files can be deleted before repeating.) When PSE has restarted, choose “Photos Effects” and then “Show All” from the drop-down menu.

Once the action/script is installed and showing up in the effects palette, prepare the workspace according to the instructions included with the script. Some scripts will require a certain type of file to be open and saved or certain layers to be active. See each product specific instructions for the details. When you are ready to try run a script, double-click on the icon on the effects palette and it should begin right away.

It is a good idea to save any work you have started before running an action/script! It may perform steps that you won’t be able to just “undo.”
Installing Scripts - Photoshop Elements on a Mac

These instructions will help you install scripts for Photoshop Elements (PSE) on a Mac. Since PSE does not have an option to run a script directly, it will be run from an action. Once installed, your script will run the same as any other action.

Close PSE, if you have it running.

Locate the folder for your operating system within the files you have downloaded and unzipped. Inside this folder, you will find an .atn (action) file, a .png file and a .jsx script file.

Install the Script:
Copy and paste the .jsx file to the following location:
MACINTOSH HD\Library\Application Support\Adobe\Photoshop Elements

Install the Action:
Copy and paste the .atn file and .png file to the following location:
MACINTOSH HD\Library\Application Support\Adobe\Photoshop Elements\(your version number)\Photo Creations\Photo Effects

Now that you have installed the new actions, restart Photoshop Elements.

Run the Action (which runs the script):

From the Effects panel, choose “Photos Effects” and then “Show All” from the drop-down list.


You will now see the icons for the new action/script you installed listed along with the other ones. The actions will all fall in alphabetical order. If you hover over the icon, you will see the name pop-up.

Note: If you have followed all of these instructions and your actions are not showing up in the effects window, you may need to rebuild the media database for PSE.

To Rebuild the Media Database:

• Close PSE
• Go to Library\Application Support\Adobe\Photoshop Elements\(your version number)\Locale\ en-US
• Find the file named “MediaDatabase.db3” and rename it to “MediaDatabaseOLD.db3”
• Restart PSE

Keep in mind that since you renamed the Mediadatabase.db3 file your program will have to rebuild, so you may have to wait a while for it to do so. Also, after every group of new actions is installed, you may need to repeat these steps. Any 'old' database files can be deleted before repeating. When PSE has restarted, choose “Photos Effects” and then “Show All” from the drop-down menu.

Once the action/script is installed and showing up in the effects palette, prepare the workspace according to the instructions included with the script. Some scripts will require a certain type of file to be open and saved or certain layers to be active. See each product specific instructions for the details. When you are ready to try run a script, double-click on the icon on the effects palette and it should begin right away.

It is a good idea to save any work you have started before running an action/script! It may perform steps that you won’t be able to just “undo.”

Friday, April 9, 2010

Installing Scripts - Photoshop

There are three different ways to install and run scripts in Photoshop. To fully utilize the time-saving tools these scripts were meant to be, I highly recommend using Option 1 – Run from an Action or Function key. This method only takes a couple minutes to set up and will make the scripts available with the click of a button.

Option 1 - Run from an Action or Function Key:

Place the script file in a location of your choice. I use a folder on my desktop called PS_Effects. Within that folder is a subfolder called 0_Scripts where I put all of my jsx files.

Before creating a new action to run the script, open a new document and save it. You can save the document to your desktop and delete it when you are done creating the actions.

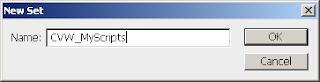
Go to Window>Actions to display the actions palette. Every action must belong to a “set”, which is a folder containing one or more actions. Choose an existing action set or create a new one by opening the fly-out menu on the actions palette and selecting “New Set.”


In the New Set pop-up that opens, give the action set a name and click “OK.”


If you created a new action set, it will now appear at the bottom of the actions palette.


With your action set selected, click on the new action button at the bottom of the action palette.


In the New Action pop-up window, give the new action a name. Verify that the set is correct one where you want the action to go.

In the Function Key field, select a function key from the drop-down (if desired). This will be the shortcut key for running this action.

Click on the Record button to begin recording.


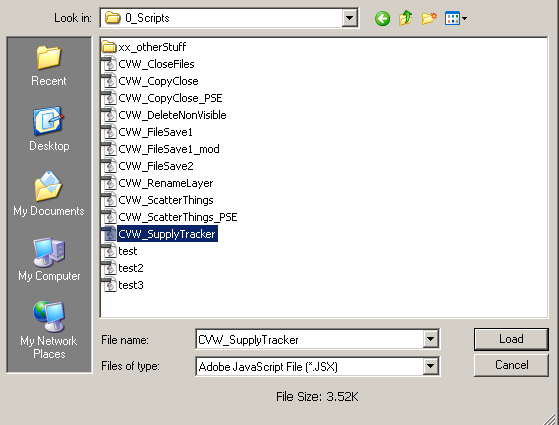
Go to File>Scripts>Browse to navigate to the scripts folder you created and select the script you want to run.

Double-click the script name or select it and click “Load” to run the script.


Once the script is finished running, click the Stop button. This stops the action from recording any more steps.

When finished, if you click the arrows to open the different levels of the action, you should see a line that says 'Scripts' followed by a line that says 'Javascript File' and the path of your file.


If you did not select a function key previously or want to change the function key assigned to an action, double-click on the action name (not the set name) and the Action Options dialog window will open. You can now assign/change the function key.


To run the script, you simply press the function key assigned to it!

The script can also be run by selecting the action from the actions palette and pressing the Play button.


The last and most important step is to SAVE the action set. With the action set selected, open the fly-out window and select “Save Actions.” In the window that pops up, navigate to where you want to save the action and click “Save.”


Option 2 - Permanent Installation

Install Script: Your script download should include a file with the ending “.jsx.” With Photoshop closed, copy this file and paste it into the scripts folder for Photoshop. (It is a good idea to also keep a copy of the script in the original folder outside of Photoshop.) You can find the Photoshop scripts folder at this address:

On a PC: C:\Program Files\Adobe\Photoshop (your version)\Presets\Scripts\

On a MAC: Applications>Photoshop (your version)>Presets>Scripts.

NOTE: With this type of installation, Photoshop will read this script every time it opens. If you have a lot of extra presets installed, it will take longer for Photoshop to read them all. If Photoshop has slowed down for you and you have a lot of presets loaded into the program, it might help to limit the number of presets you have installed and use one of the other methods of quick installation when you need a script as you work.

Run Script: To run a permanently installed script, go to File>Scripts>(Name of the script).


Option 3 - Install in Folder of Choice and Run from File Menu

Install Script: If this is your first Photoshop script, create a folder on your hard drive to copy them to. For example, you might create a folder like C:\My Documents\Photoshop Tools\Scripts. Then, with Photoshop closed, copy and paste the .jsx file from the download into the scripts folder.

Run Script: File>Scripts>Browse and then navigate to the scripts folder you created and select the script you want to run. Double-click the script name or select it and click “Load” to run the script.