Close PSE, if you have it running.
Locate the folder for your operating system within the files you have downloaded and unzipped. Inside this folder you will find an .atn (action) file, a .png file and a .jsx script file.
Install the Script:
Copy and paste the .jsx file to the following location:
C:\ProgramData\Adobe\ Photoshop Elements
Install the Action:
Copy and paste the .atn file and .png file to the following location:
C:\ProgramData\Adobe\ Photoshop Elements\(your version number)\Photo Creations\photo effects
Note: If you can’t find the folder, it is hidden. You will need to tell your computer to un-hide it. This is how: Go to My Computer \C: and type Alt+T. This will bring up a menu. Click on “View” and check the box to Show Hidden Files.
Hint: To easily find this folder again, so that you can install additional actions, select the option to create a desktop shortcut to it by right-clicking on the photo effects folder before you enter the folder. Make sure you do this BEFORE you enter the folder.
Now that you have installed the actions and scripts, restart Photoshop Elements.
Run the Action (which runs the script):
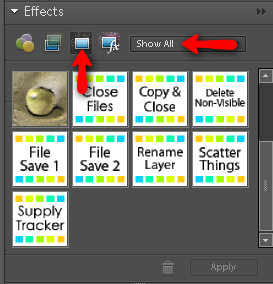
Choose “Photos Effects” and then “Show All” from the drop-down list.

You will now see the icons for the new action you installed listed along with the other ones. The actions will be in alphabetical order. If you hover over the icon, you will see the name pop up.
Note: If you have followed all of these instructions and your actions are not showing up in the effects window, you may need to rebuild the media database for PSE.
• Close PSE
• Go to C:\ProgramData\Adobe\Photoshop Elements\(your version number)\Locale\en_US
• Find the file named “MediaDatabase.db3” and rename it to “MediaDatabaseOLD.db3”
• Restart PSE
Keep in mind that since you renamed the Mediadatabase.db3 file your program will have to rebuild, so you may have to wait a while for it to do so. Also, after every group of new actions is installed, you may need to repeat these steps. (Any 'old' database files can be deleted before repeating.) When PSE has restarted, choose “Photos Effects” and then “Show All” from the drop-down menu.
Once the action/script is installed and showing up in the effects palette, prepare the workspace according to the instructions included with the script. Some scripts will require a certain type of file to be open and saved or certain layers to be active. See each product specific instructions for the details. When you are ready to try run a script, double-click on the icon on the effects palette and it should begin right away.
It is a good idea to save any work you have started before running an action/script! It may perform steps that you won’t be able to just “undo.”


thank you, thank you, thank you! These are the greatest things since sliced bread -- this is the third time I've downloaded them and I find I can't digi-scrap without supply tracker. It's not really to save the credits for publishing, because I don't do that, but it's the best place to find what I used on a layout -- frees up a lot of brain space
ReplyDeleteI used to be able to use these scripts. Somewhere along the line, after updates both computers and programs I no longer have any of them. I have tried making this work, but can't figure it out with Windows 10. Is it possible you can add instructions for using these with Windows 10. I love them and miss them.
ReplyDeleteThanks in advance.
I appreciate your positive feedback. Unfortunately, there is no way for me to help you, as I do not own Windows 10. Your best be would be to try googling for some digital scrapbooking forums where someone may have found a solution. Good luck!
ReplyDelete