Close PSE, if you have it running.
Locate the folder for your operating system within the files you have downloaded and unzipped. Inside this folder, you will find an .atn (action) file, a .png file and a .jsx script file.
Install the Script:
Copy and paste the .jsx file to the following location:
MACINTOSH HD\Library\Application Support\Adobe\Photoshop Elements
Install the Action:
Copy and paste the .atn file and .png file to the following location:
MACINTOSH HD\Library\Application Support\Adobe\Photoshop Elements\(your version number)\Photo Creations\Photo Effects
Now that you have installed the new actions, restart Photoshop Elements.
Run the Action (which runs the script):
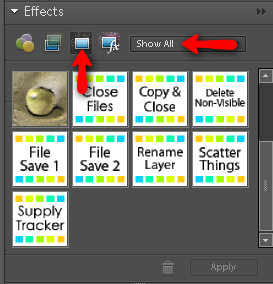
From the Effects panel, choose “Photos Effects” and then “Show All” from the drop-down list.

You will now see the icons for the new action/script you installed listed along with the other ones. The actions will all fall in alphabetical order. If you hover over the icon, you will see the name pop-up.
Note: If you have followed all of these instructions and your actions are not showing up in the effects window, you may need to rebuild the media database for PSE.
To Rebuild the Media Database:
• Close PSE
• Go to Library\Application Support\Adobe\Photoshop Elements\(your version number)\Locale\ en-US
• Find the file named “MediaDatabase.db3” and rename it to “MediaDatabaseOLD.db3”
• Restart PSE
Keep in mind that since you renamed the Mediadatabase.db3 file your program will have to rebuild, so you may have to wait a while for it to do so. Also, after every group of new actions is installed, you may need to repeat these steps. Any 'old' database files can be deleted before repeating. When PSE has restarted, choose “Photos Effects” and then “Show All” from the drop-down menu.
Once the action/script is installed and showing up in the effects palette, prepare the workspace according to the instructions included with the script. Some scripts will require a certain type of file to be open and saved or certain layers to be active. See each product specific instructions for the details. When you are ready to try run a script, double-click on the icon on the effects palette and it should begin right away.
It is a good idea to save any work you have started before running an action/script! It may perform steps that you won’t be able to just “undo.”


No comments:
Post a Comment