
What: Scatter things will make up to 100 copies of one or more selected layers. Each layer will be randomly resized, rotated and scattered, based on some parameters entered into a pop-up window that appears when the script is run.
How: Scatter Things can be run from an existing layout or from a new document.
Using the Script:
Open an existing layout or create a new document. Add one copy of each ‘thing’ you want to scatter.
If you would like your layers to have a layer style, like a drop shadow, you can add one before running the script and all of the copies will have the same layer style.
At this point, it is a good idea to create a ‘Snapshot’ of your document. Then, if you don’t like the way things are scattered, you can easily return to this point and try the script again. Because everything is random, you will get different results each time, even with the same settings in the pop-up window.
To create a snapshot, open the History palette using Windows > History. Click the New Snapshot button at the bottom of the History palette. The new snapshot is added to the list of snapshots at the top of the History palette. Clicking on Snapshot 1 in the history palette will return you to this state, should you not like the results after the script is run.

Select the layer or layers that you want scattered. If you are selecting more than one layer, hold the Ctrl key while you select multiple layers.
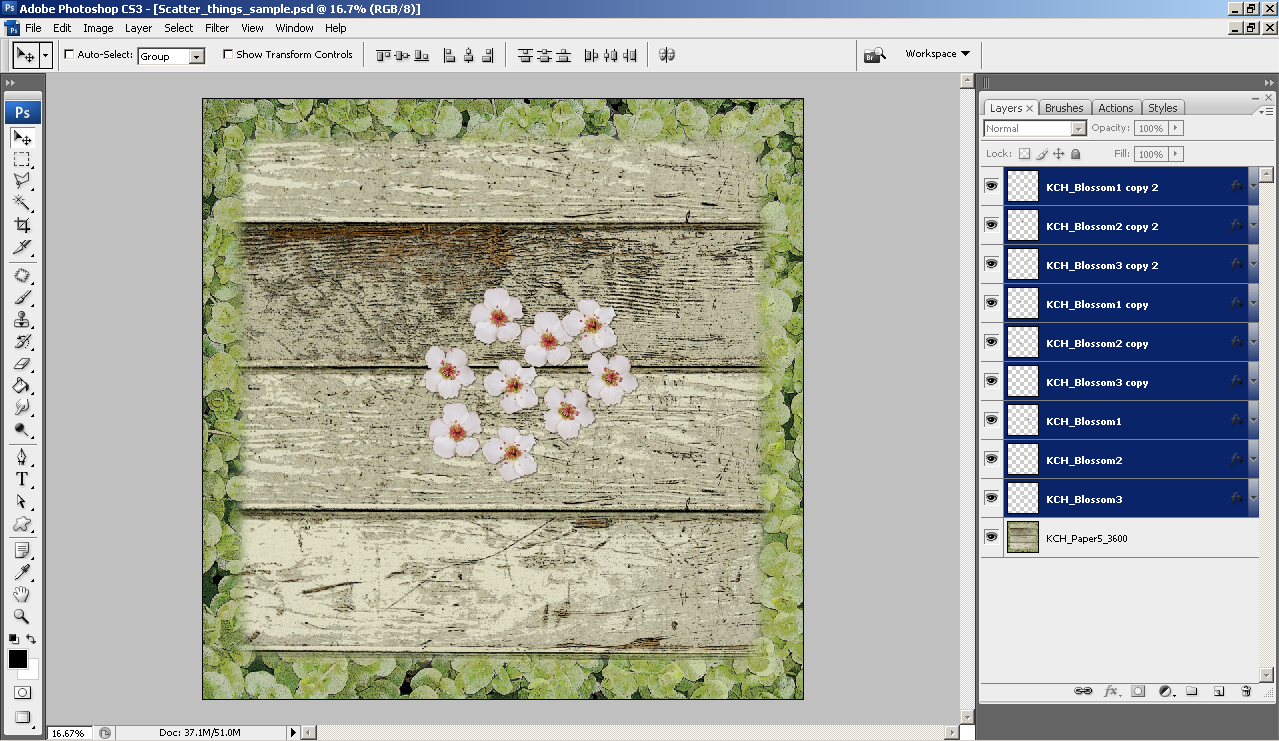
Run the script and this pop-up window will appear, giving you some scattering options.

Number of Copies: Scatter Things will make up to 100 copies of each layer that is selected. If you need more than 100 copies of something, simply run the script again.
Size Variation: Scatter Things will vary the size of the copied items by up to 100%, larger and smaller, than the original item. If you want all of the copied and scattered items to stay the same size, enter 0 (zero) in the Size Variation field.
Angle Variation: Scatter Things will also rotate the copied items from 0 to 360 degrees, left and right. To leave items in their original orientation, enter 0 (zero) in the Angle Variation field.
Once you have your values set in the pop-up window, press OK and watch the script do its magic!
When the script is finished, each copy is put on it’s own layer in a layer group called ‘Scattered Things’. Having each copy on its own layer allows you to modify the final results to your liking.

All of the original layers are moved to a layer group called ‘Original Things’ and placed at the bottom of the layers palette. The visibility of the layer group is turned off.

By default, the script allows parts of the layers to be off the edges of the document. If desired, you can quickly resize the layers to fit within the boundaries of your document by selecting the ‘Scattered Things’ group layer and pressing Ctrl-T (Cmd-T).

Then, drag the transformation handles to resize the whole group to be within the document.

If you want your ‘Scattered Things’ limited to a certain shape, create a new layer with your shape on it. Place the shape layer below the scattered layers. This will give you a visual reference for moving or deleting things that are outside the desired shape.
Note: The reference layer will be deleted once you are done, so it can really be anything, a shape, a background paper, embellishment, etc., anything that gives you a visual reference for your desired shape.

Press V to select your Move Tool. Then, make sure ‘Layer’ is selected in the ‘Select Group or Layer’ dropdown.

If you check the ‘Auto-Select’ option, you can simply click on each layer and move or delete it as desired. For my sample, I moved all the flowers to inside the heart shape, leaving some of them over the edges of the heart.

Then, I deleted the heart ‘reference’ layer, leaving a beautiful heart made of random flowers.


Other Ideas for the Scatter Things Script:
The Scatter Things script can also be used to just create a bit of randomness on items too.
Here is a sample of a title made from alphas, with the letters lined up neatly. Each letter is left on its own layer.
Select all the layers in the layers palette and run the script.

If you set the Number of Copies to zero, the script will not make any copies, but will still randomly change the size and angle of the layers selected using the values entered in the Size Variation and Angle Variation fields.

Here is the ‘Scattered’ Title run at 20% Size Variation and 20% Angle Variation.

Photo Collages:
Scatter Things can also be used to make photo collages.
First, put a copy of each photo in a PSD. For this sample, I have 60 photos and simply put them on my page, one on top of the other.
16
Your photo sizes will probably be quite large, relative to your canvas size, so you will need to reduce them. How small to make them will depend on how many photos you are trying to collage and how big your canvas is. You may have to experiment a bit to get it just right.
To reduce all the photos at once, select all the photo layers. Then press Ctrl+T (Cmd+T) and drag one of the corner transformation handles down to the desired size. It does not matter if the pictures are in the middle of the canvas or not, as the script will scatter them anyway. (This is a great time to save or make a snapshot).
Here are the resized photos on a 12x12 canvas.

With all the photo layers still selected, run the Scatter Things script with these options:

By choosing ‘1’ copy, the script will make a copy of each photo then resize, rotate and relocate them randomly.
Choosing a 50% size variation gives a variety of photo sizes - up to 50% bigger and smaller than the original. Set this value to ‘0’ (zero) to keep all the photos their original size.
Choosing an angle variation of 30 degrees keeps all the pictures somewhat vertical and right side up. A greater number can be entered if you prefer more variation in the orientation.
The script scatters the pictures randomly, based on the input values. When it is finished, you can add effects like a white stroke and drop shadow to each layer, if desired. You can also move and resize photos, to fill in any gaps and to make any favorites more prominent.
Here is the finished collage!


Christy, I love this! I can't wait to try your script!!
ReplyDeleteI have tried the link to download this script but it says I do not have permission to download the file from this server. I get the same error when trying to download Rename Layer as well.
ReplyDeleteAny help would be appreciated
Parker3152shaw.ca
Hey Jody! Sorry you are having troubles downloading those two scripts! This is still a lingering issue from some server trouble I had before. After each script there are the words '4Shared'. If you click on the 4shared after each of those scripts, you can download them from there.
ReplyDeleteHave a blessed day!
Where do I find this script? I'm not sure where it's supposed to be.
ReplyDeleteHey Brian! All scripts can be found on the sidebar of the blog using the page 'Download Free Scripts'.
ReplyDeleteWow this is stunning!
ReplyDeleteWow - this looks awesome - can't wait to try it. Thank you so much for sharing this script!
ReplyDeleteI use Photoshop Cs5 on a Mac. Can I use your awesome scripts?
ReplyDeletethank you so much for the wonderful script!
ReplyDeleteI was looking for like this for a long time :)
You are featured on my blog to Japanese readers. thanks again!
http://digital-scrapbooking-japan.blogspot.com/2012/04/totorial-script-scattering-elements.html
I LOVE this script ... I've been looking for something like this for ages ... THANK YOU!!!
ReplyDeleteThank you so much!!
ReplyDeleteI really love this details resources that you have shared here details idea bout Photoshop editing technique
ReplyDeleteyou also check my resources
That's a prominent blog. Thank you so much for it fromecommerce photo editing service provider
ReplyDeleteThis tutorial is super helpful and well-explained! The idea of using scripts to scatter objects in digital scrapbooking adds such a fun, dynamic touch to designs. It’s great to see creative ways of enhancing layouts without manually placing every element—it definitely saves time and boosts creativity. This approach to digital crafting reminds me of the precision and creativity needed in immersive photography. For example, a 360 degree photo editing service can transform panoramic images into seamless, interactive experiences that draw the viewer in. Whether it's enhancing lighting, stitching images, or correcting perspectives, these services help ensure every detail is polished. Just like your script makes designing easier and more visually exciting, editing services bring out the best in visuals. Thanks for sharing such a cool and useful technique!
ReplyDeleteExcellent tutorial! The scatter effect brings amazing energy and depth to any design.
ReplyDeleteYour clear instructions make it easy for beginners to follow along.
I can already think of so many creative uses for this technique.
For a polished final touch, MyPixeler’s photo editing services are the perfect companion.